For a Passive House, there appears to be two dominant wall types: a double stud wall, or continuous exterior insulation. Hammer & Hand details these options nicely. While there are only two main designs, there are still plenty of products and approaches that make for infinite ways to assemble. After throwing cost, eco concerns, and ease to build into the equation we’re left with a lot to consider.
For our house, we’re leaning towards continuous insulation for two reasons. First, we’re guessing that framers in our small town will be more comfortable and familiar with it. Second, since we’re only in climate zone 4, it doesn’t take too much insulation to meet standards. When you’re dealing with 4"-8" exterior insulation, a double stud wall starts to become more appealing. With our choices narrowed down, we can take a look at targets, products and installation details.
How Much Insulation Do We Need?
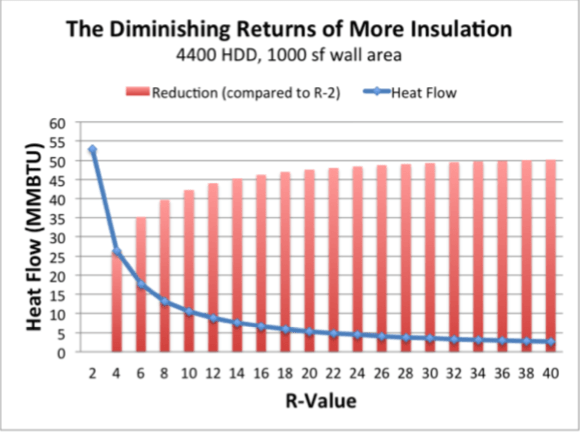
Diminishing returns of insulation
Most importantly, we have to figure out the perfect intersection of cost and energy savings. A great program for this is BEopt. Even as a beginner, it only took a day to start getting useful data out of it. If you’re going for Passive House certification, you could also play with their software, or hire a Passive House consultant. A third option is to look at public data and studies that consider your climate zone. That said, we came up with targets for our climate zone, which put our ideal wall R value around 25.
When thinking about insulation, remember that the R value in the stud bays will be lowered a bit by loss through the studs. There are plenty of online calculators that can give you the exact R value for your assembly. We also have to consider drying of the walls. Green Building Advisor addresses the minimum thickness required, and fortunately for us:
“If you are building a house in one of the warmer climate zones — zone 1, 2, 3, or 4 (except for 4 Marine) — you don’t have to worry about the thickness of your foam. Any foam thickness will work, because your sheathing will never get cold enough for “condensation” (moisture accumulation) to be a problem.”
Framing Considerations
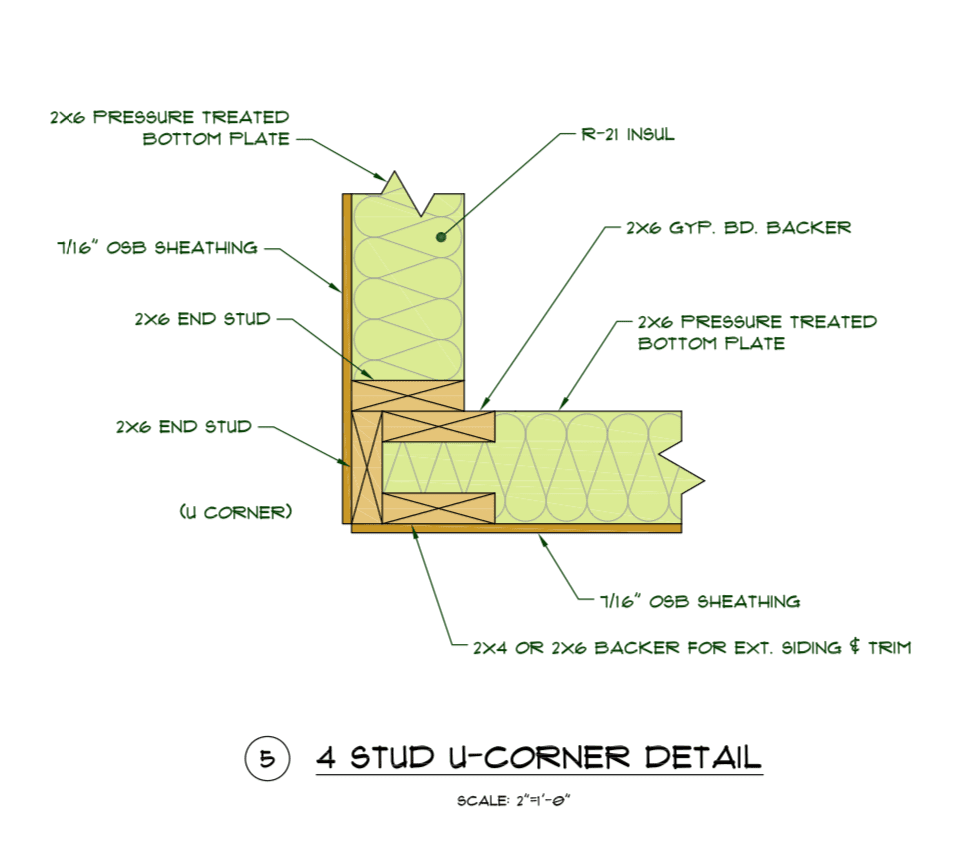
U Stud corner
As far as framing goes, there is near universal agreement that using 2x6, 24" OC is the way to go. It is also agreed that advanced framing techniques should be used, which allows for more insulation and uses less wood. This covers, among other things: two stud corners, ladder blocking, Only one top plate and insulated headers.
For the two stud corners, we found this PDF to be a great overview of all corner options. A two or three stud corner allows for the most insulation. However, we’ve read concerns of the strength where the sheathing meets the corners, so the U-Corner image would present a nice solution to that. More data is needed here. Additionally, there doesn’t seem to be much information on insulated headers, which leads us to believe most are just created on the job site instead of buying prefab ones. However, we’ll need to research more about how this applies to long, solid headers.
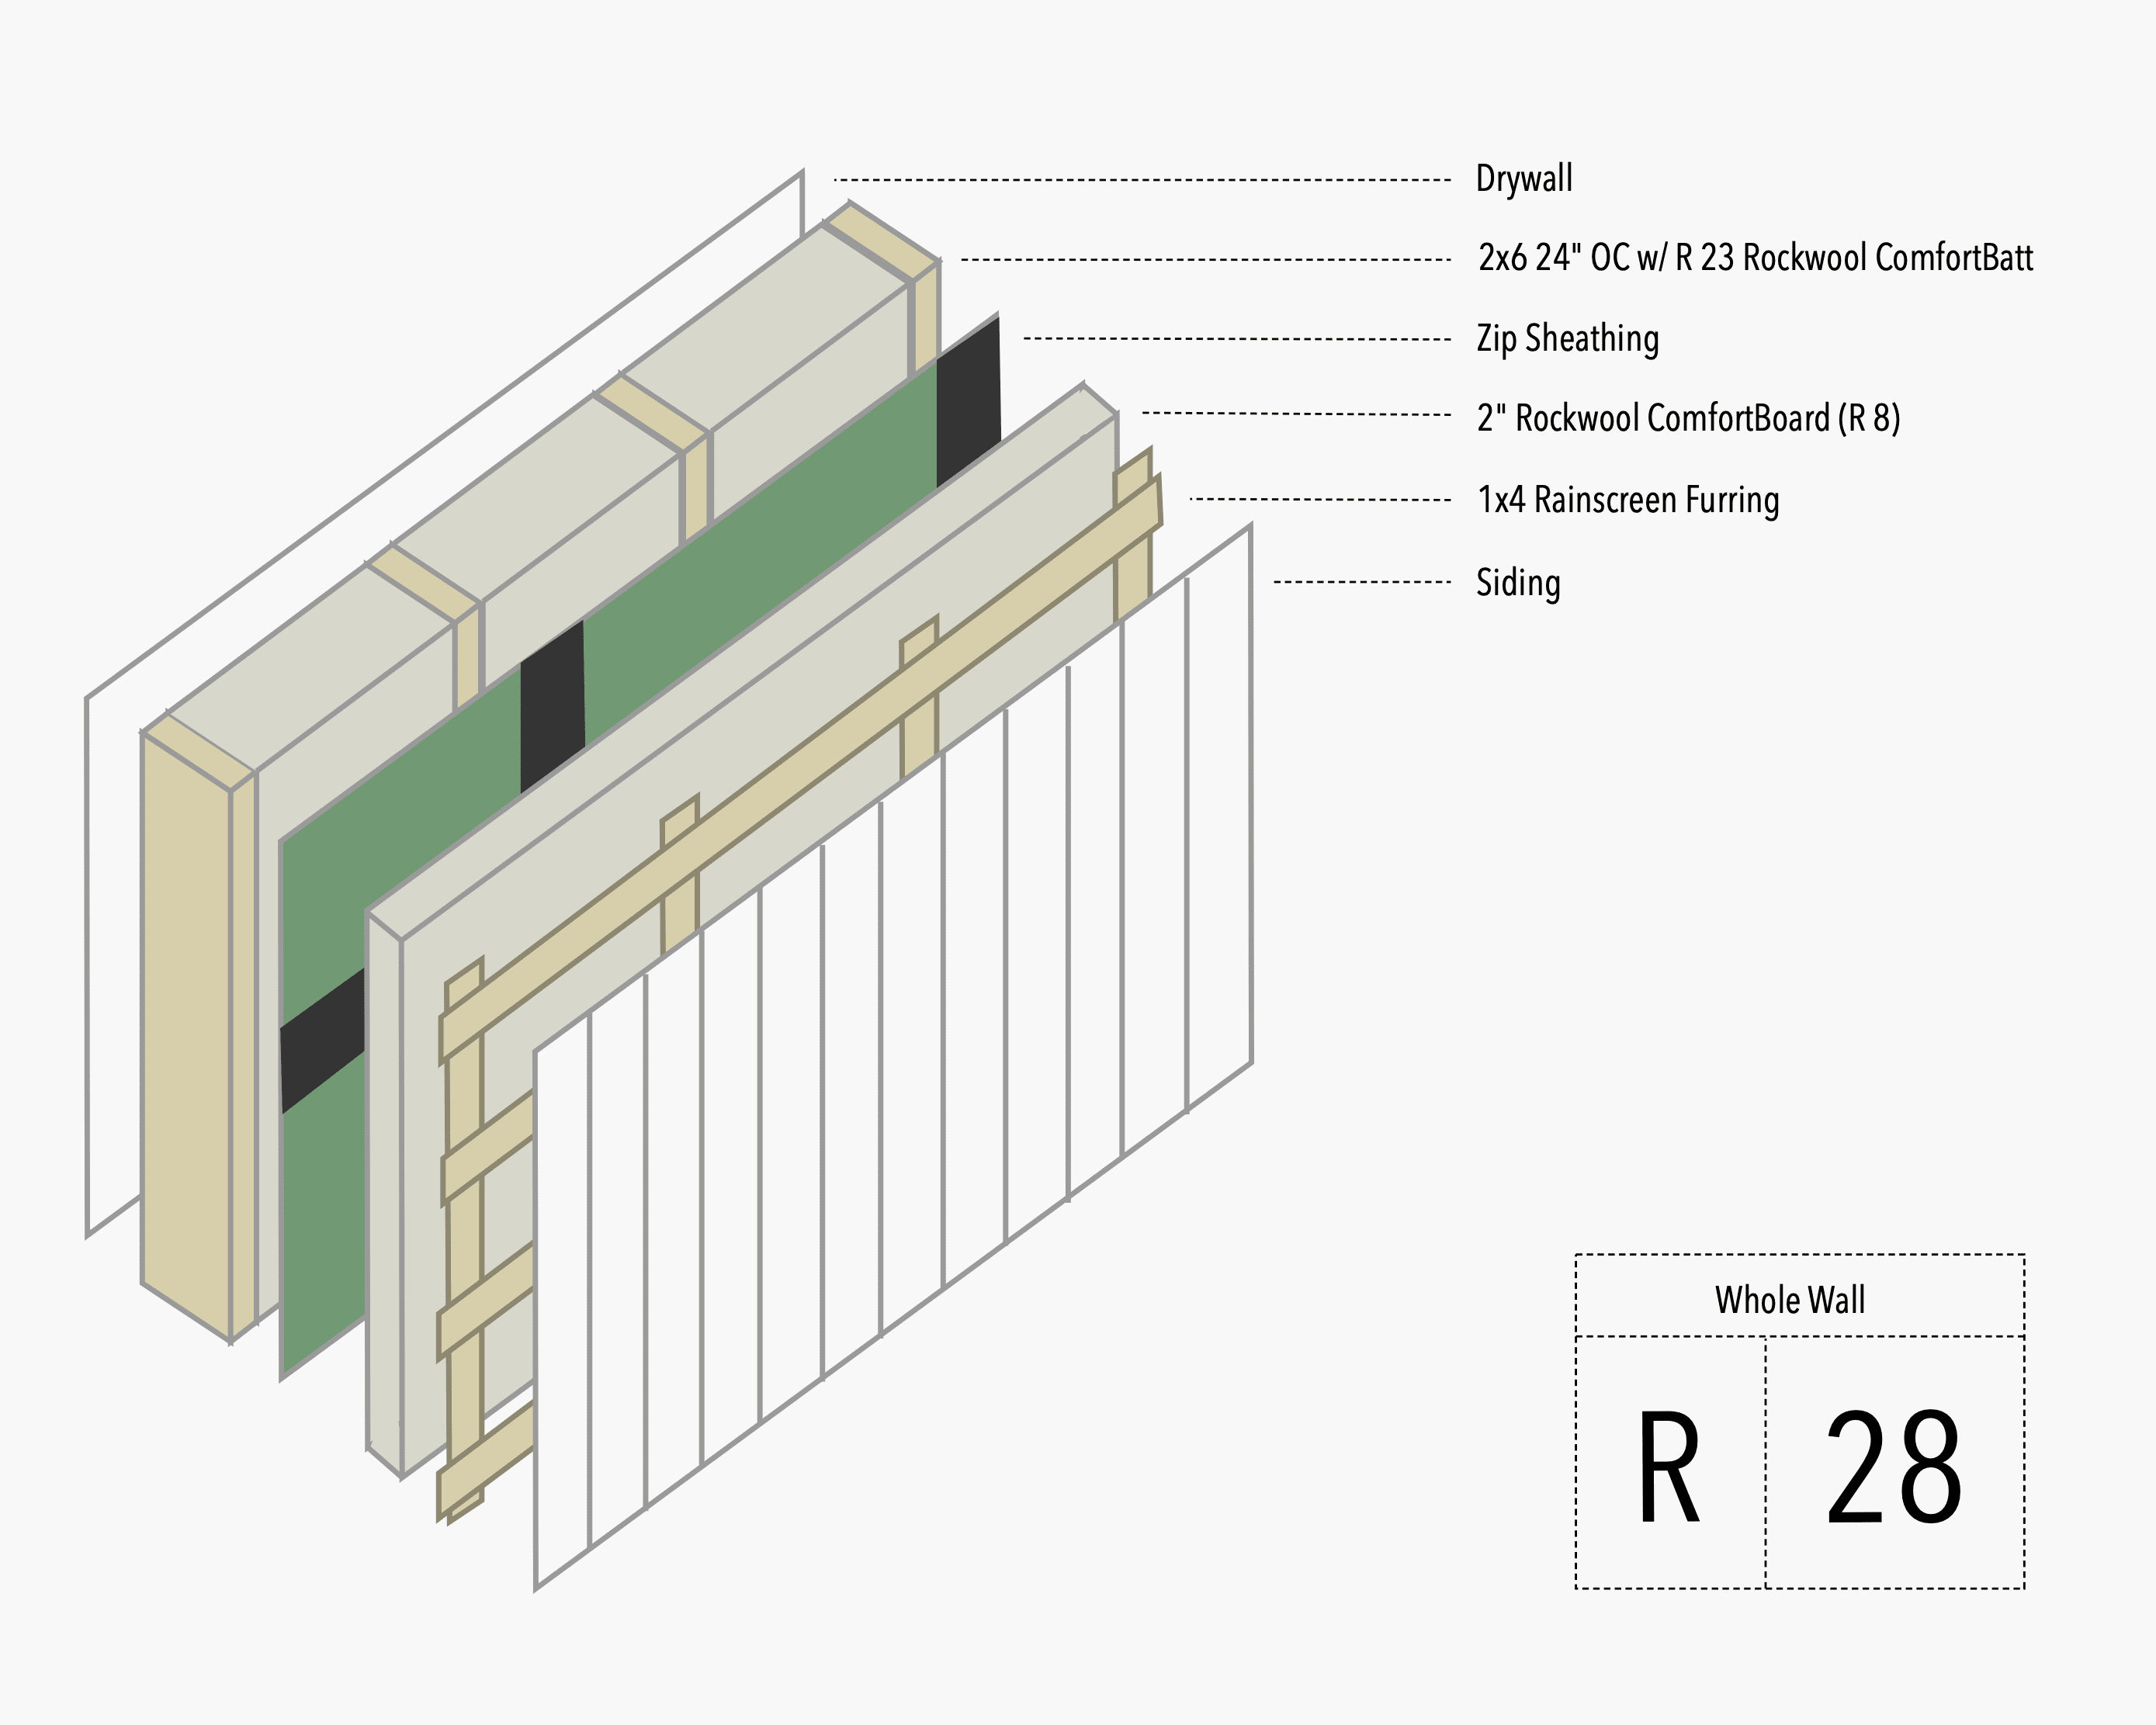
Approach to Continuous Insulation
Because we’re novice builders, we have to go with a somewhat established approach to continuous insulation. And while there are a lot of products, two seem to dominate the online mindshare. It’s a battle between Zip System R Sheathing and Rockwool.
First, let’s look at Zip.
Introduction to ZIP System® R-sheathing insulated sheathing
The obvious benefit here is ease of installation. In one pass of the house, the sheathing, air & water barriers and the continuous insulation can go up. To top it off, installation is similar to what most crews are used to, so it should go smoothly assuming everyone pays attention to the details.
A few downsides come to mind with this system. First, the siding is attached directly to the Zip System. Any miscellaneous holes at this step will hurt your air tightness. Second, the sheathing is further away from the studs. If installed correctly, Zip R is supposed to hold up against all building science tests, but it is hard to imagine perfect execution. Finally, and perhaps due to our poor history with water damage, it isn’t ideal for the air & water barrier to sit so close to the elements. Even with a mesh rainscreen, the heart of our wall system is exposed to wind and water. Again, we’re not builders, so we haven’t validated these concerns in the field. However, it’s worth noting that season 40 of This Old House placed down standard sheathing along with an air and water barrier house wrap before installing Zip R. Those extra layers would alleviate our concerns, but take away the ease of installation aspect.
Once you’re open two or three passes on the exterior of the house, the Rockwool method becomes an option.
Rockwool + RainScreen Exterior - This is a killer assembly!
This approach would still use Zip System sheathing – just not the Zip R variation. Instead, Rockwool Comfortboard would sit outside of the sheathing. After that, a 1x4 rainscreen. Then, the siding. There are a few benefits to this approach. First, our air barrier is now protected by a rainscreen gap and two inches of insulation. Second, the siding is attached to the furring strips, so there won’t be any unknown holes in the air barrier. Finally, Rockwool has better sound dampening qualities.
Compared to using Zip R, Rockwool will get you less R per inch. It’s also hard to determine which is more environmentally friendly. We’ve read concerns of the mineral wool binding agent, but we also see that refuted. Finally, rainscreen installation is a bit tricky. Proper fasteners must be used correctly to give the siding the needed support, and accidental holes in the air barrier must be sealed.
Cost Differences
Update We looked at 8 different wall assemblies, so head on over to read our cost findings.
The material cost between these two approaches is about the same. With the Zip R, a 4x8 sheet (32 sqft) is $54. Similarly, standard Zip sheathing is $18.68 for a 4x8 sheet. Add on $38.83 for 32sqft of Rockwool Comfortboard 80 (a 48sqft pack is $58.24), and that brings us up to $57.51. So, the Rockwool assembly is $3.51 more per 32sqft, or about 10 cents per sqft.
Considering all other parts of the assembly are similar – they both need tape and they both need either a wooden or mesh rainscreen – this feels like a reasonable assessment.
So, between these two approaches, the biggest cost difference should be labor. If you can truly get by with one pass of the house with Zip R, it will come in cheaper on the labor front. If you use sheathing and a house wrap with Zip R, it will be no different than the Rockwool approach.
Windows
We’ve been keeping tabs on a few window options. Right now, the front runner is probably Alpen. However, we don’t have any specific metrics or referrals to go by with that – it’s just our gut feeling by what we’ve read the past few months. One huge plus to Alpen is their support for ThermalBuck.
ThermalBuck in Three Minutes
Cost permitting, ThermalBuck appears to be a simple way to streamline window installation while ensuring there are no thermal breaks. Finding a window manufacturer that encourages the use of ThermalBuck and maintains the warranty is a huge plus. Our understanding of current Alpen windows is that they are not true triple pane – we’ll need to verify. There is also talk of a thinner, lighter, triple pane model in development.
One last note – if we use Thermalbuck, we’re going with “outie” windows. It’s worth debating the merits of “innie” windows in more detail before making a final decision.
Other Details
We’ve already got a lot to consider, but surely we’re missing other details. Two come to mind right now.
- Some sort of bug screen is needed. Cor-a-vent looks like a nice product, or we can just use a generic bug screen.
- It might be best to do a pass along all stud bays and holes with AirDam or something similar. We fully intend for Zip to be the primary air barrier, but we lean towards redundancy. Might even throw in an AeroBarrier pass for good measure.
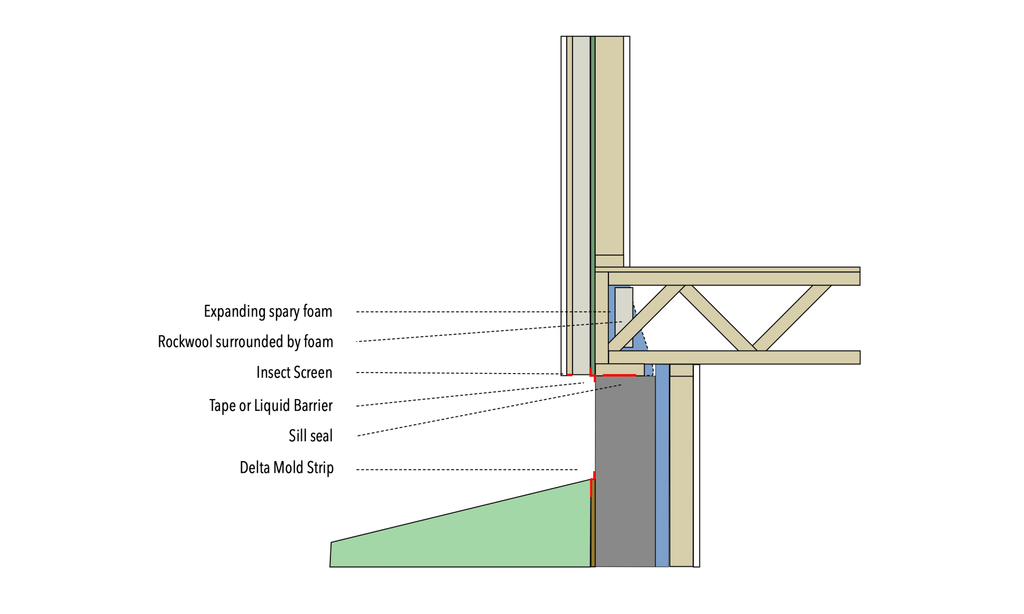
Transitions
We plan to detail transitions from wall to roof, and basement to wall in a different post. Here are some notes for now:
-
Simpson SDWC Truss Screw (https://www.youtube.com/watch?v=TQWzBmpAJxQ) to tie truss down to top plate instead of the twist bar thing that would require significant sealing, and would break the air barrier. Or, to keep zip warranty, use one of these: https://www.jlconline.com/how-to/interiors/leaks-at-h-clips-with-zip-sheathing_o
-
Continue air barrier on ceiling? Use Intelloplus or Siga Version instead of certainteed?
-
Use continuous bead of sealant at top plate instead of wrapping Zip over top?