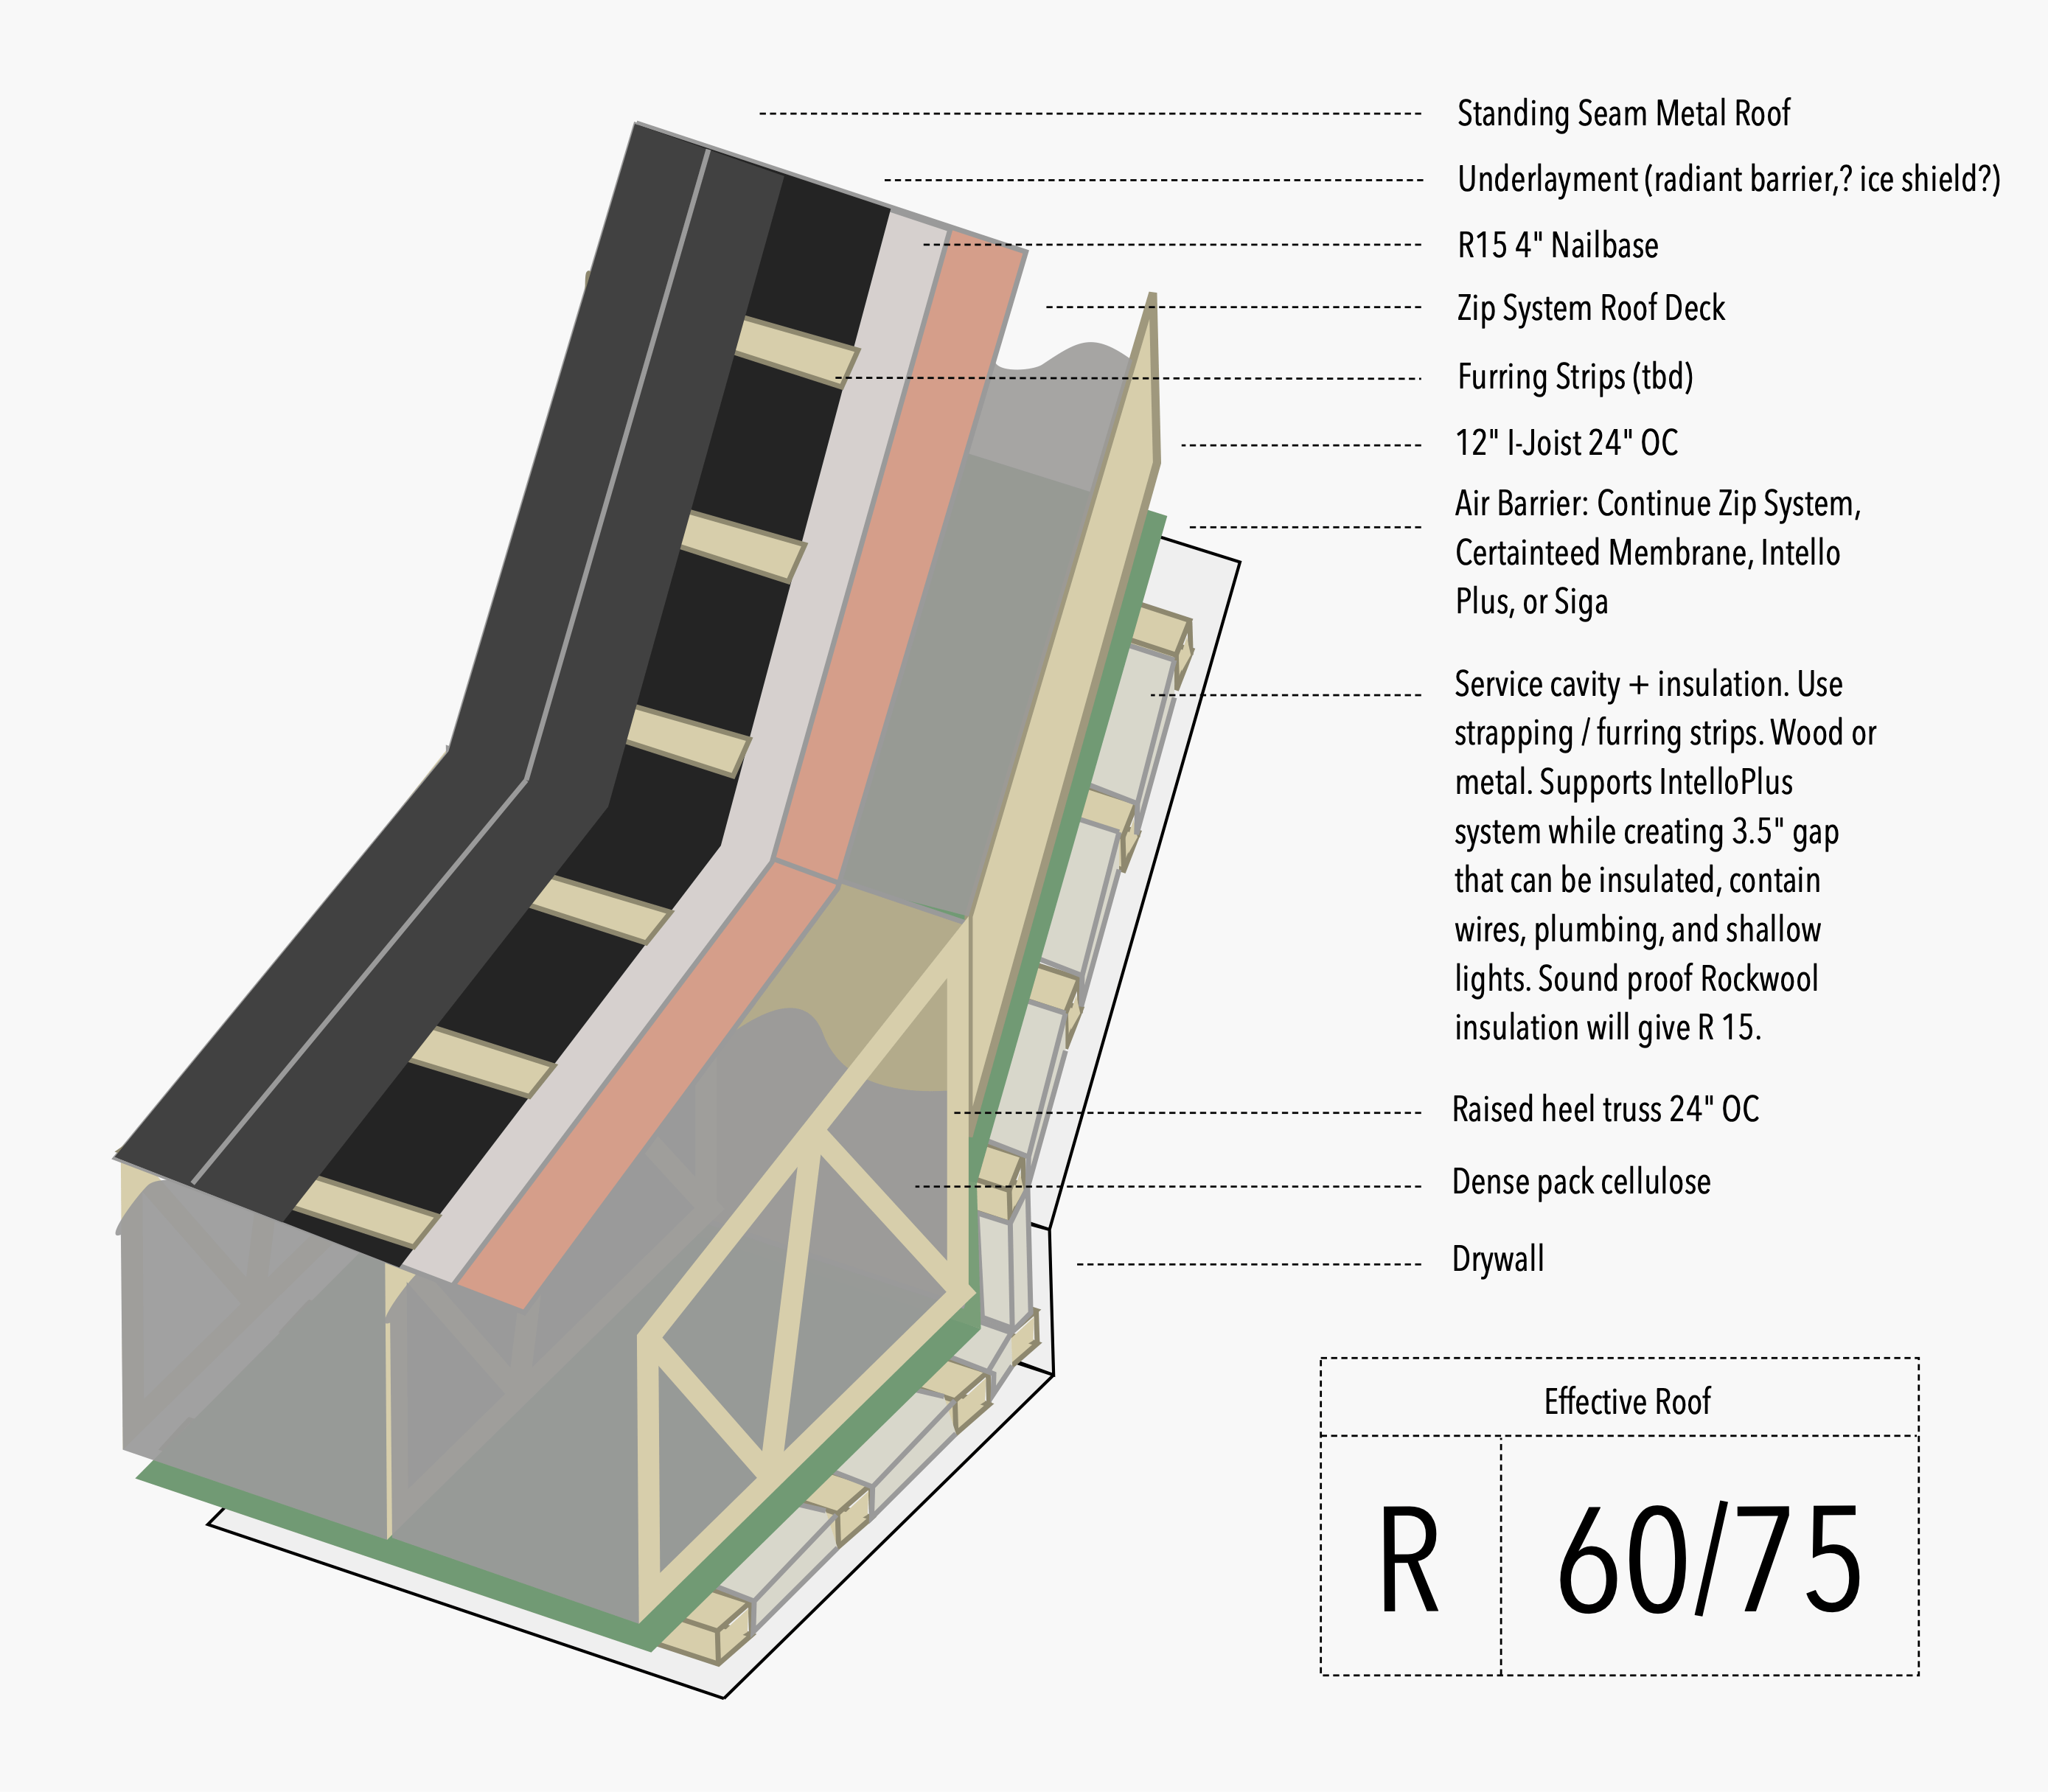
Roof assembly is definitely a trickier subject than wall assembly. Where walls have a few agreed upon approaches, roofs have to consider moisture, drying, vented or unvented, truss types, multiple air barrier locations and roof type. There are also details where the roof may change from a truss to a joist, which will affect the insulation design. Being novices, this leads to quite a bit of confusion. Below we’ve gathered some initial thoughts, but we’ll have to consult with some experts on this one. As our design stands, there is a lot of redundancy, which may or may not be necessary.
How Much Insulation, and Where?
Since we’re in favor of exterior insulation for the thermal break benefits, the first insulation concern is keeping the roof dry. The best article on the subject that we’ve founds is on Green Building Advisor: How to Install Rigid Foam on Top of Roof Sheathing. Specifically, in climate zone 4, you’ll need at least R-15 on top of the sheathing, which is 3"-4" depending on the material we choose.
Given our exterior insulation choice, the next rule is that the insulation must directly touch the roof sheathing from above and below. That is easy from above since the insulation sits on top of the sheathing. From below, it can be harder to keep consistent contact. Our initial preference is to use dense pack cellulose, but we don’t have hands on experience with it. Are there areas where it will settle and lose contact with the roof deck? If so, a safer alternative may be to go with an initial layer of closed cell foam under the deck, followed by cellulose for the rest.
Finally, what is the ideal R value of the entire roof? Going back to our climate targets, it’s somewhere around 45-50 for a compact roof and 60 for a vented attic. Because we’re interested in a service cavity (R-12 or so) and exterior insulation (R-15), we’re already at R-27. Coming up with another R-30 in the 12" I-Joists and the raised heel trusses should not be a problem.
Service Cavity
Metal furring channel
Starting from the inside out, we’re leaning towards a service cavity that the drywall attaches to. This would serve a few purposes. First, it allows for a layer of sound dampening insulation. If we go with a metal roof, this is an added benefit. Next, it allows us to run wires, install slim recessed lights, and potentially a few HVAC related items. It can brace your joists and improve the installation of drywall. Perhaps most importantly, it prevents everything from interfering with the air barrier or attic insulation. That said, this topic is hotly debated.
Now, 1x3 strapping is easy enough, but that doesn’t satisfy our desire for added insulation and shallow recessed lights. For that, the ideal depth would be 3.5". We’ll have to figure out how much weight can be applied to the ceiling to find out what products we can use. There are metal channels designed for similar application, but it’s not clear if they will work in this context.
UpdateStrapping to hold up the Intello barrier followed by 1x3 perpendicular strapping would work.
Air Barrier
For the “official air barrier”, a layer of Intello Plus attached directly to the ceiling is our current thought. Instead of continuing the Zip Sheathing under the ceiling, it seems easier and lighter to install a membrane. Also, blown in insulation will be easier to work with when using a membrane. There are some transition details to work out where the walls meet the roof, which we’ll address later on.
One point of confusion in this area is that there are multiple air barriers. The drywall can act as an air barrier. If we choose to use closed cell foam directly under the roof deck, that will be an air barrier. If the roof deck itself is made of Zip Sheathing, that too will be an air barrier. Maybe this redundancy is good? Or, it may be too complex and expensive. If so, we’ll need to consult a few people to iron this out.
Roof Deck
As touched upon above, the roof deck material is an unknown to us. Do we just use a basic decking material, or use Zip Roofing? With Zip, we gain an air and water barrier at an additional cost. However, the air barrier may be redundant. Likewise, if we add a Grace Ice & Water Shield, the water barrier of the Zip Roofing becomes redundant. Because we’ve had so many issues with water in the past, the redundancy doesn’t bother us, but the cost must be evaluated.
Continuous Exterior Insulation
When you add the roof deck with the exterior insulation, you’ve essential got a structurally insulated panel – two layers of OSB with foam sandwiched in the middle. To achieve this, ZIp roofing can be used with Nailbase on top. Another option would be to place Rockwool on top of the roof deck, and a layer of OSB on top of the Rockwool. Right now, we don’t have a preference. To be investigated.
Water Barrier and Venting
Where and why do we have to vent? We’ll need a good understanding of this. Also, is a water barrier necessary both above and below the exterior insulation?
It seems cathedral ceilings don’t need to be vented, but local code may force it anyway. Check this ahead of time. Same article says it is hard to do unless a true gable roof.
Roof Type
Metal or Asphalt. Why? Right now … looks. We’ll have to research this.
Notes and Other Thoughts
-
Zip on the outside, on top of the top plate. Truss sits on the zip sheathing. Continue zip as the ceiling. Then, drop a 2x3 service cavity down, and drywall the fake ceiling.
-
Same as #1, but use a membrane instead of zip.
-
Zip on the outside, and order trusses without overhangs. Continue zip up and over entire roof. Then, build overhangs off of that.