


Posts About construction
Below you'll find 27 results. Have a look, or check out our other topics.
Homebridge and AlarmDecoder
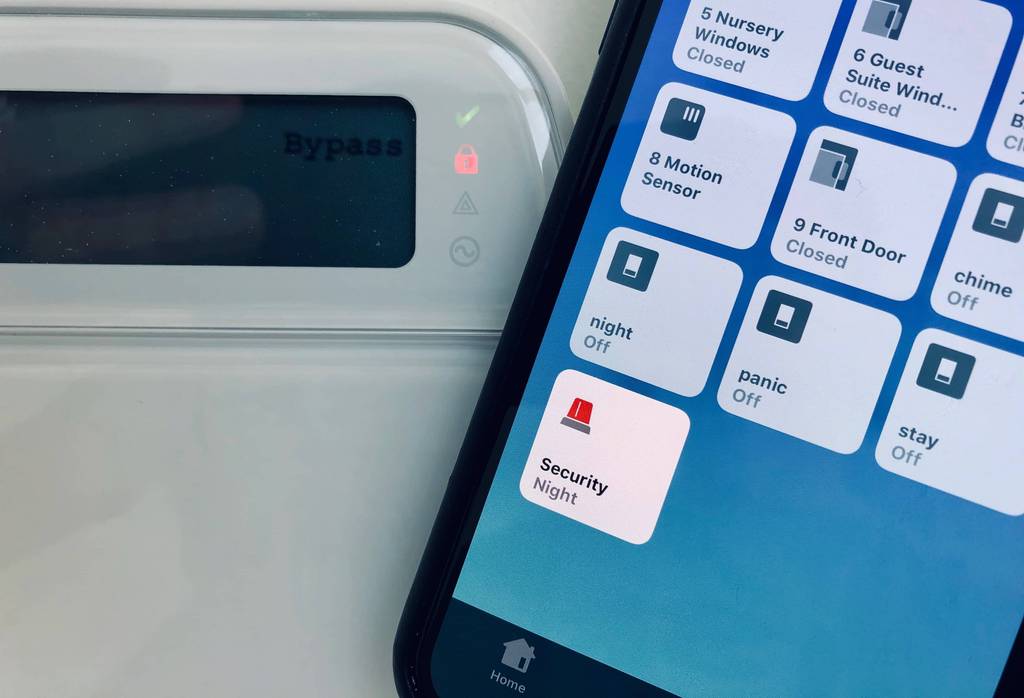
A few months ago we got Pi-hole and Homebridge up and running in our current house. The goal was to test them out and see if they would be a good fit for a new, dream house. In that same spirit, we went ahead and ordered AlarmDecoder so that we could hook up our existing DSC alarm to Homebridge as well. While the installation process was a bit more intimidating than Pi-hole, it was still approachable and has been working out well for the past week. We’ve documented some of the pros, cons, thoughts and references for when we revisit this during the new house build.
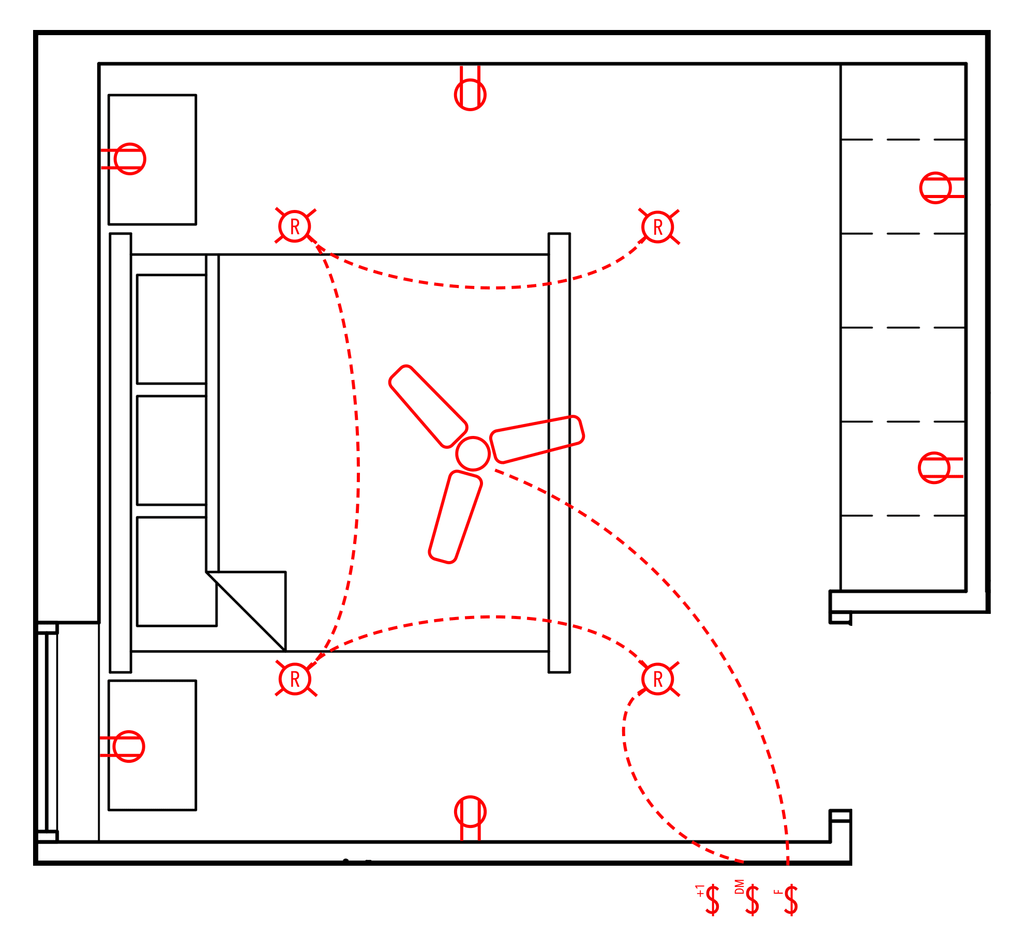
Master Bedroom Floorplan Iterations
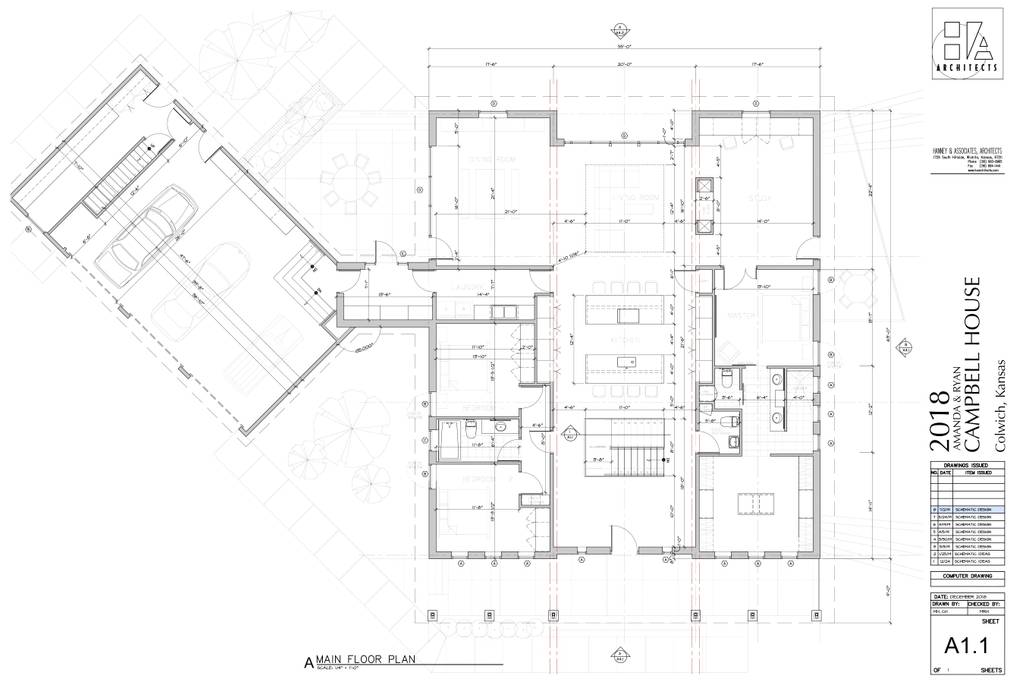
Finalizing a floorplan takes a bit longer than you would expect. Be prepared to get your hands dirty and become familiar with at least one of the various home software tools. We found LiveHome3D to be a great tool for quick iteration, but eventually you will have to bite the bullet and learn Sketchup or a similar pro tool. Once you’re iterating, you’ll be amazed at how many ways you can place walls and furniture in a square area. It’s almost addictive to find a way to fit something (i.e.: a TV, and then strive for the next goal of fitting something else (i.e.: a bathroom closet).
A Homeowners First Take On LEED Certification
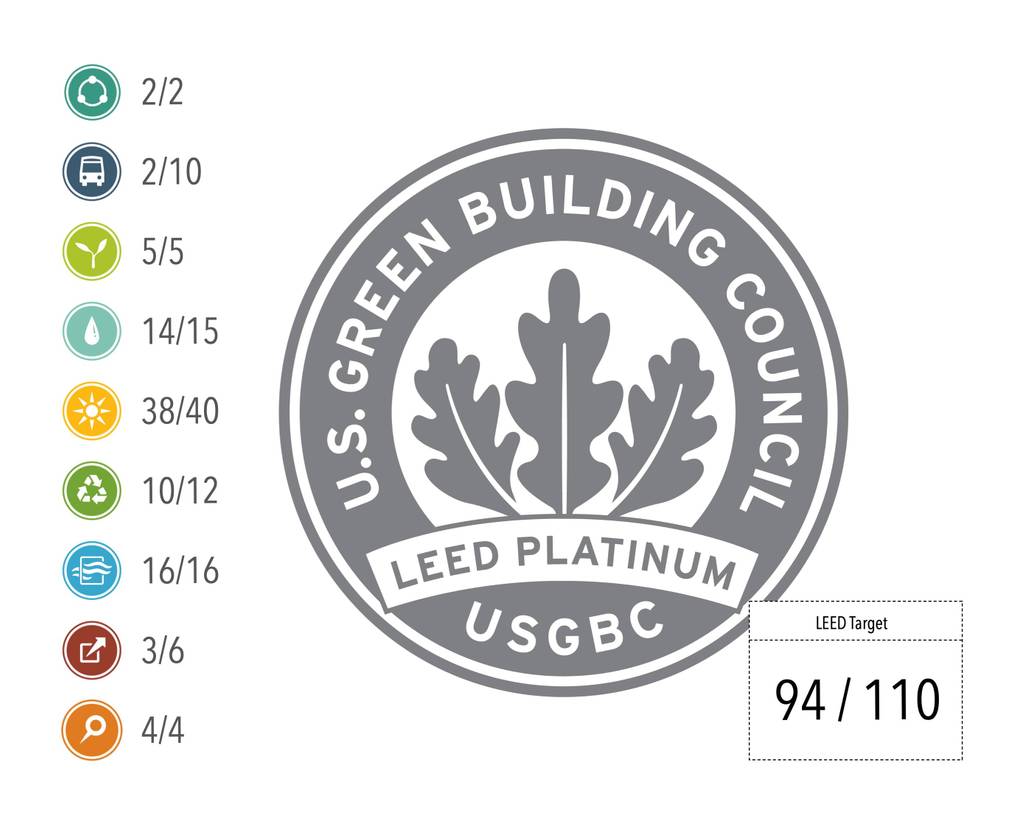
While our primary goal is to become Passive House certified, we’ve always wanted to consider other building certifications. This week, we finally got around to reviewing what LEED has to offer. LEED, or Leadership in Energy and Environmental Design, “raises the bar on the green building industry. From improving energy performance to emphasizing human health and integrative building design, LEED encourages project teams to operate beyond the status quo.” With that noble goal in mind, we jumped right in to version 4.1 to see where our project stands, what practical changes can be made, and whether or not we should go for certification.
Working Out Floor Transitions
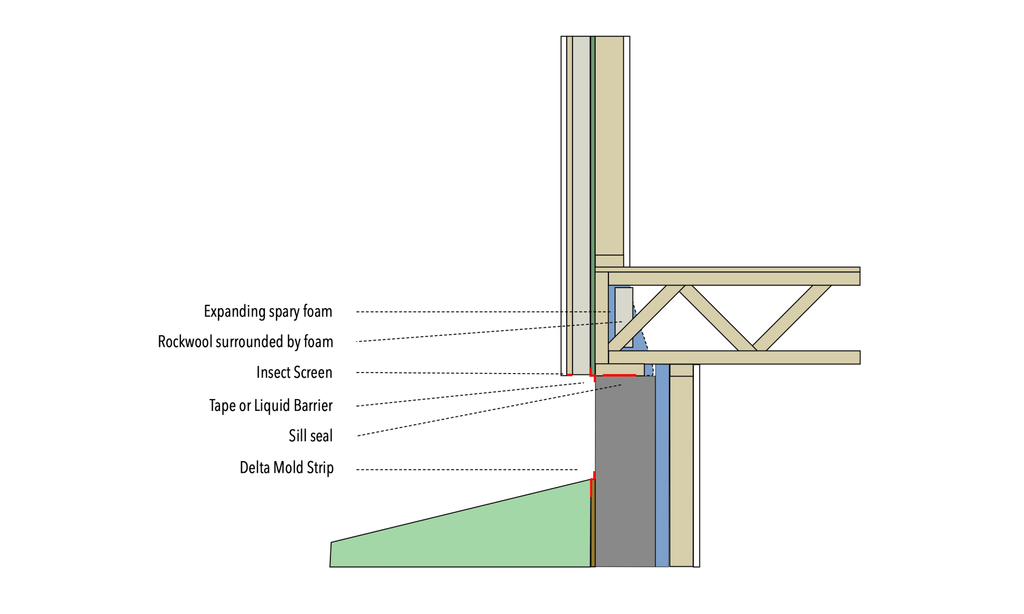
We’re on to the floor now that we’ve done a first pass on the roof. We have to figure out how the first floor walls will transition to the rim joist and basement walls. Mainly, we have to prevent thermal bridging, maintain the necessary R values in the floor, and continue the air barrier. It will also be worth considering floor trusses vs joists, and how to arrange the floor for soundproofing. The spacing of the supports and the type of insulation can affect the latter. As with the first floor ceiling, some sort of service cavity (probably of the cheaper, generic drop ceiling variety) is likely to be used.
Working Out Roof Transitions
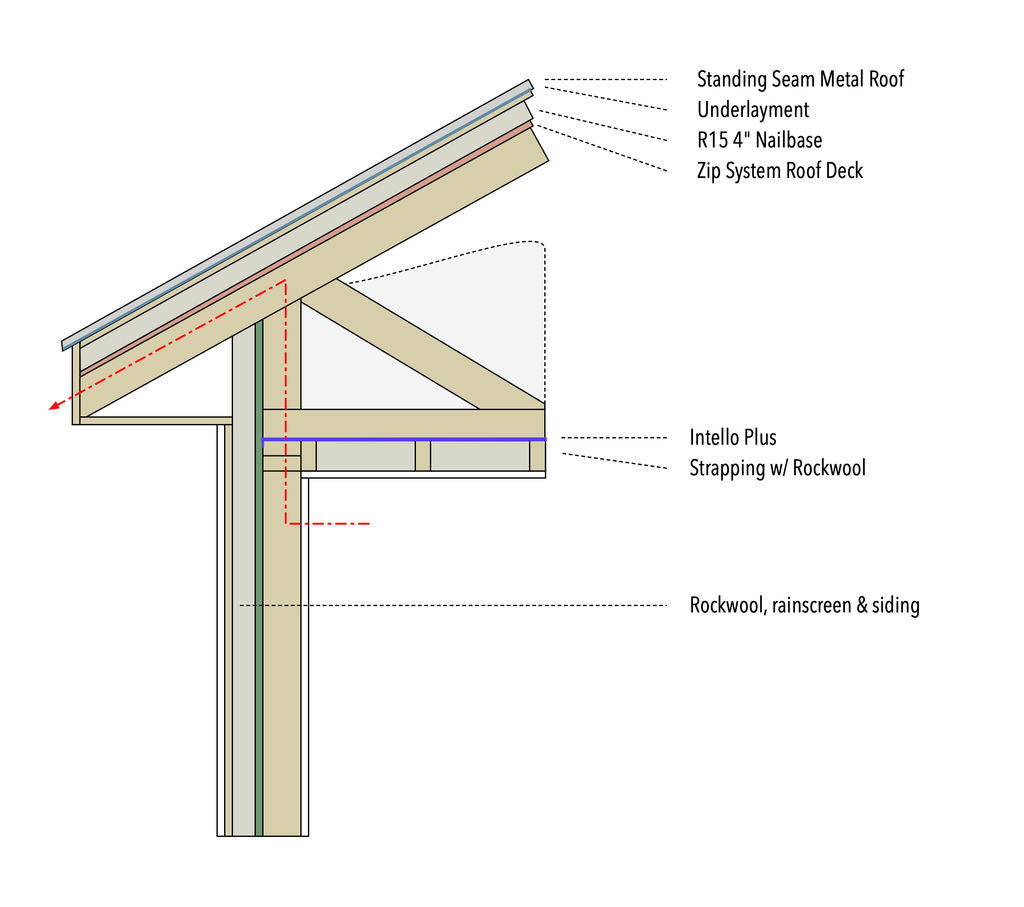
As we dig into the roof assembly a bit more, we’re coming across transition details that need to be ironed out. First, how is the thermal envelope continued around the overhangs? There is a thermal bridge up the wall studs and through the trusses and out of the overhangs. This seems to be a similar issue at both eave and rake overhangs. Second, how will the air barrier transition from the Zip sheathing to underneath the trusses? Do we use Zip and Intello, or stick to just Zip? We’ll have to turn to our trusty Youtube and Green Building Advisor resources to see what we can find.
Electrical Primer
One of our goals with this build is to know basics about each trade, so that we can ask the correct questions. So, we’ve done some preliminary research on residential electric to come up with the notes below. Areas of interest range from fundamentals to products to understanding our electricity needs. If we research enough, we should hopefully be able to have a conversation with an electrician, and be able to sort the professionals who care from those who don’t. Disclaimer: this is all new to us, so please don’t take anything at face value – always confirm with a professional.
Some Initial Metrics
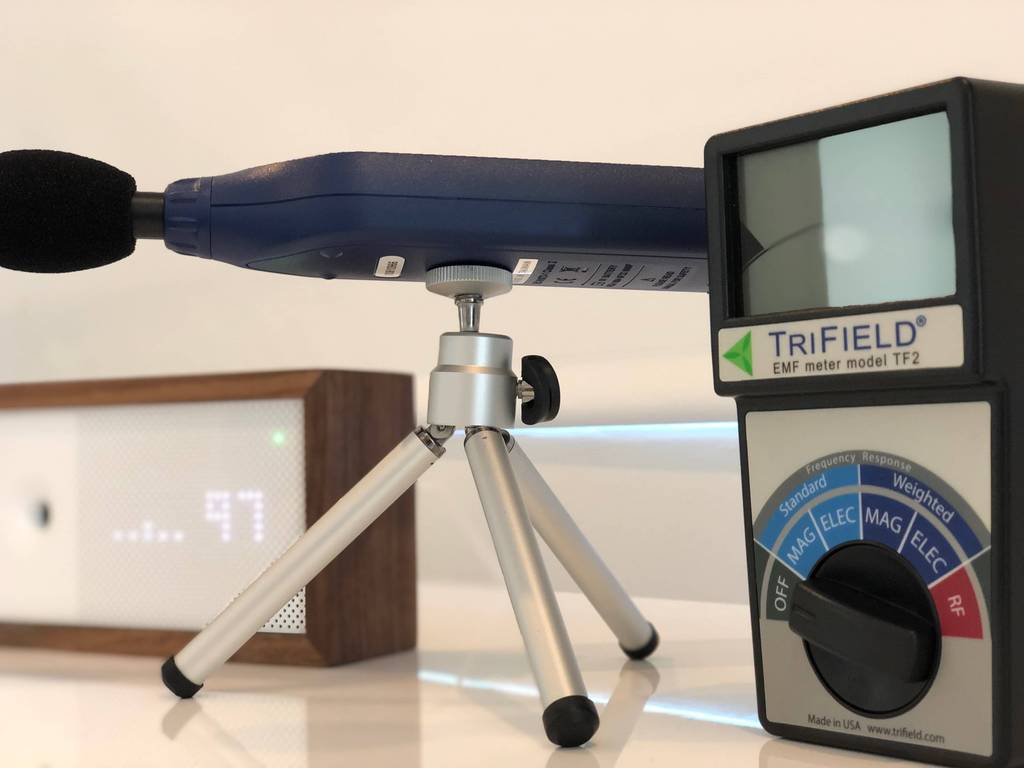
As we think about the metrics we would like to measure and improve on, it helps to get a baseline from our current environment. We may do a professional audit when the new house is complete, but for now we’re going to save money and use readily available tools to get ballpark estimates. For air quality we’ll be using Awair. For sound, REED R8060. For EMF, Trifield TF2. Radon and air exchange are not relevant or cannot be measured in our current house. So, with that in mind, we’ll measure our current block house, a wood house nearby, and a brick Kansas house which sits on the land we’re looking to build on.
Setting Up Pi-hole and Homebridge
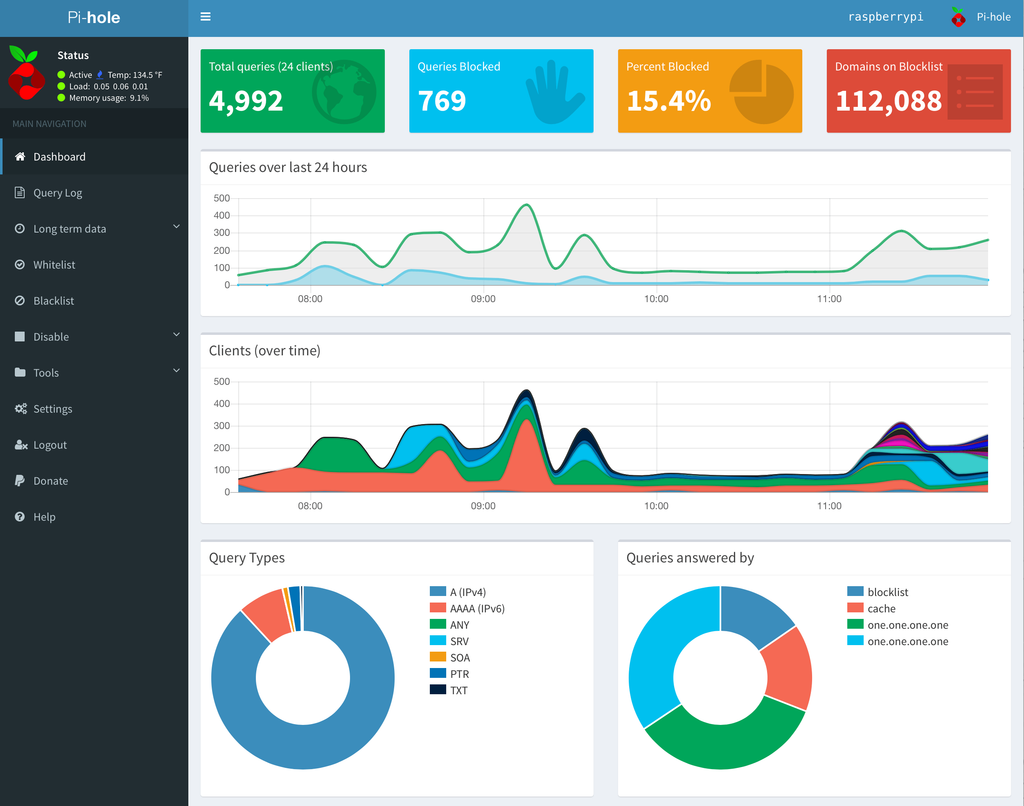
When thinking about the ideal home server room, it helps to have actual experience with as many of the tools as possible. So, I thought it would be good to try out Pi-hole and Homebridge running on Raspberry Pi’s in our current home to see how they hold up over the next year. Initial experiences show that Pi-hole and Homebridge are everything they claim to be – set and forget once you’ve gone through the smooth setup process. However, IP cameras through Homebridge will require some more love and testing. They are quite complicated to setup, and perform quite poorly so far.
Notebook on Basement Assembly
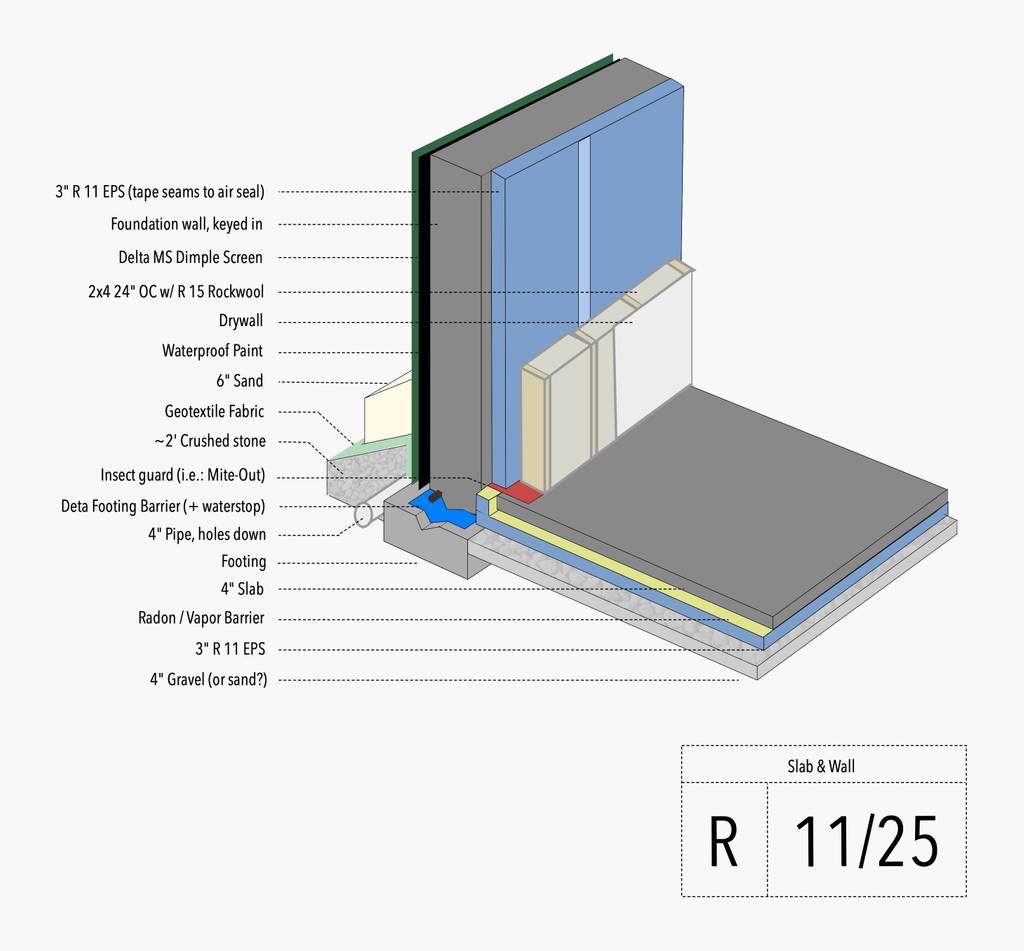
As we’ve gone down this path of trying to design a proper house with no building experience, each step has become more confusing. Starting with wall assembly, we gained some confidence that we can do this. Next, roof assembly required more thought and reading to propose something that may have potentially. And if the roof introduced a trickle of doubt, the basement opens the flood gates. Let’s be honest – without talking to experts, we’ll only be able to take the design so far. Still, we’ve given it a shot, and will continue to refine it. Hey, at least we now know more about basements and foundations than we ever thought we would.
The Case For a Passive House
Browse the Archives
Or, browse through everything we have discussed on this site. Just choose a topic to see related posts.
Get in Touch
Looking to reach us, or leave a comment? Or better yet, have a correction, resource, tip or improvement to share? Please, please, please contact us. We'll respond.
If you're old school like us, mail us at hello@bellrise.farm, or subscribe to our RSS feed.
Thanks! We look forward to hearing from you.
